This is a step by step tutorial on how Susie Wolfe and I made our BoHo bags.... If I don't explain something well enough or you feel I have left out a step... please comment and with your help it should end up being a useful tutorial... I'm going to not only tell you how we did it but why we made some of the decisions I did along the way..
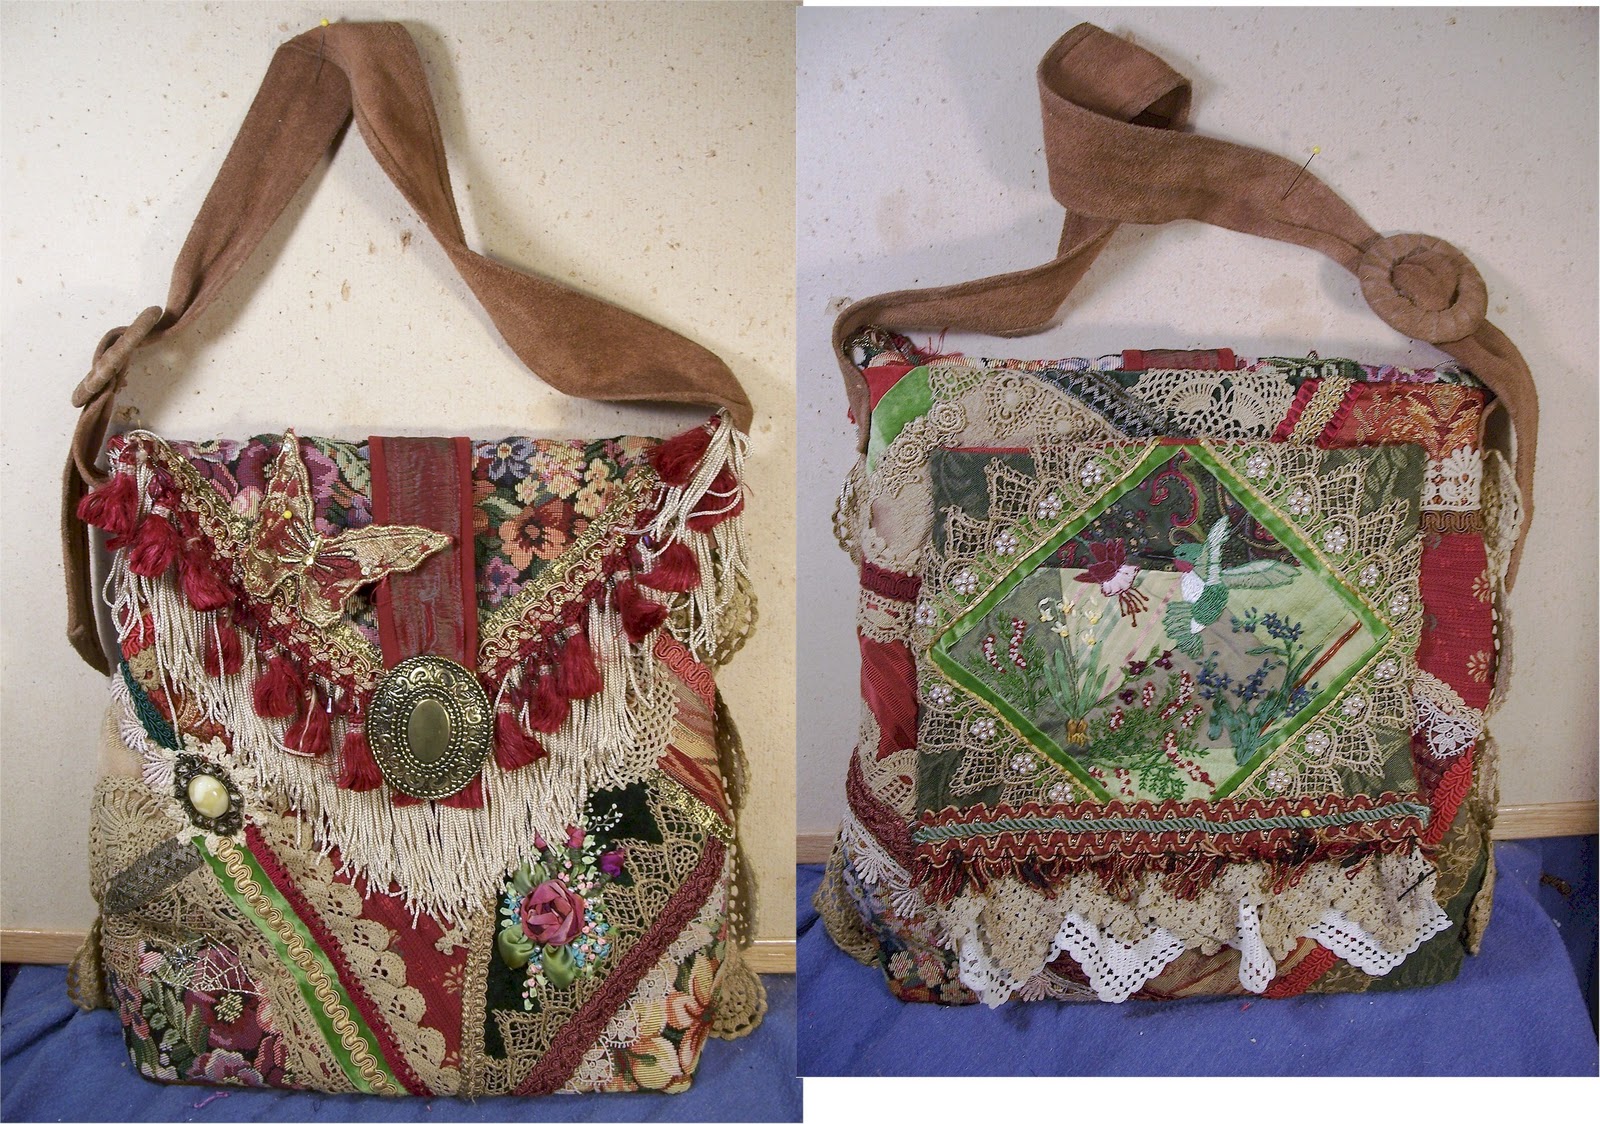
This is my bag on the left..The flap is on the front and a pocket on the back.
This is Susie's bag which has no flap and a pocket on both sides.
Size and How Many Pockets?
First some answers before you even asked the questions... I thought it a lot before I began and here are the things I felt were important to me.
1. It had to be practical. I wanted something I could set on a park bench as well as toss into the car. The embellishments were going to have to be simple enough that they wouldn't be catching or snagging on things.
2. I wanted it to be large enough to carry my supplies and a project, but not so large and heavy that I needed a wheeled cart to move it.. My favorite tote is 15"x15" so I chose those dimensions. (16"x16" to allow for seam allowances.
3. My favorite tote has a pocket on the outside which I love but no pockets on the inside which I wanted... side ones that would hold my smaller supplies and needle book and a zippered pocket which could hold a wallet when I carried just the sewing bag and not a purse.
4. Flap or no flap?? The deciding factor was travel... It is just too easy when traveling (or shopping) for a hand to slip into an open tote and extract a wallet.
5. It absolute had to be beautiful as well as functional. I want people to comment on it and ask about crazy quilting.
 Since I wanted this to be as simple a construction project as possible I chose to do it in three simple pieces and really didn't need a pattern.
There were reasons for this choice. The main consideration was I wanted to do it in sections so the pieces were a size that could be easily handled for handwork... A 16" square is not all that much larger than a usual CQ block. Secondly I wanted to avoid bulky seams when possible and doing it in three pieces still allowed for minimal seams plus workable sizes... (Later as I move along in the tutorial I will talk about using a pattern.)
For just ease of construction I could have cut it in one piece with the flap attached but then I would have trying to manipulate a section 16 x 38" to do the handwork... too large to be fun but certainly an option if you are making something on the order of a small handbag.
Avoiding Bulky Seams
These are heavy fabrics and there's no way around extra thickness if you want to use tapestries and brocades.. Trying to do traditional seams would make for bulkiness difficult to deal with. So we opted for NO seam allowances at all to deal with... Being crazy quilters we opted to try something crazy...
I had some of that thin fusible stuff "heat and bond" and Susie brought something similar called Misty Fuse which she had just bought at a quilt show so we tried both... To protect my ironing board I put down a large piece of baking parchment paper which nothing sticks to and then the 16x16" foundation fabric.. On top of the foundation fabric I put a 16x16" piece of Misty Fuse and covered it all with more parchment paper and ironed... Once the parchment paper is peeled off the Misty Fuse is bonded to the foundation fabric but still has enough fusible surface to add more to it...

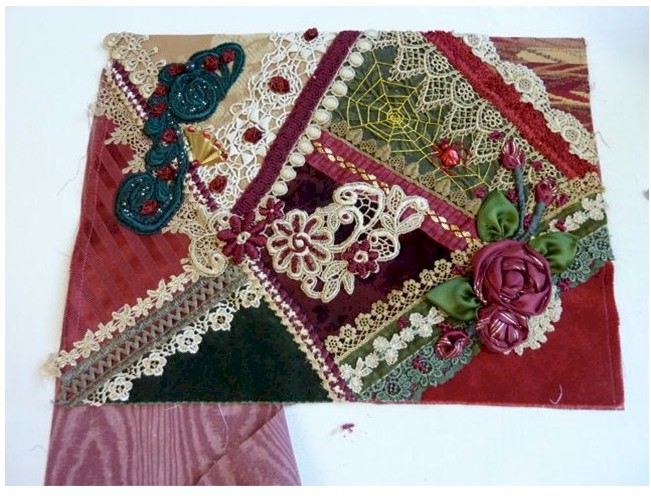
If you look closely you can see the chalk marks on the corner patches as I just about have this side covered. I'm thinking at this point I need to make the large left tapestry piece smaller by making another patch... gold I think!! The chalk worked great as we could just brush it off.
Then we carefully moved the foundation covered with patches back to the ironing board....covered it with a sheet of parchment paper and ironed it slowly on the top side until the patches fused to the foundation and for good measure ironed on the back side also... Now we had a piece covered with patches and perfectly smooth and no bulky seam allowances to deal with.
At this point both Susie and I advise you to take it to your sewing machine and sew along the edges of the patches to make them really secure....
Of course also at this point it would have been an opportune time to stop and tidy up our work area but we were so excited with the way it was shaping up that we stopped for nothing. Occasionally DH came out to the barn to see if we were still alive and took pictures of us..
Now we could begin adding ribbon, gimp and lace to all the seams... BUT the next one I make I will use my sewing machine to cover all the seams with ribbons and then I can put gimp or trim on top of the ribbon and just sew by hand to the ribbon without going through all the layers of fabric. Doing the ribbon step would really only take a little extra time and I think the time would be worth it in the long run...
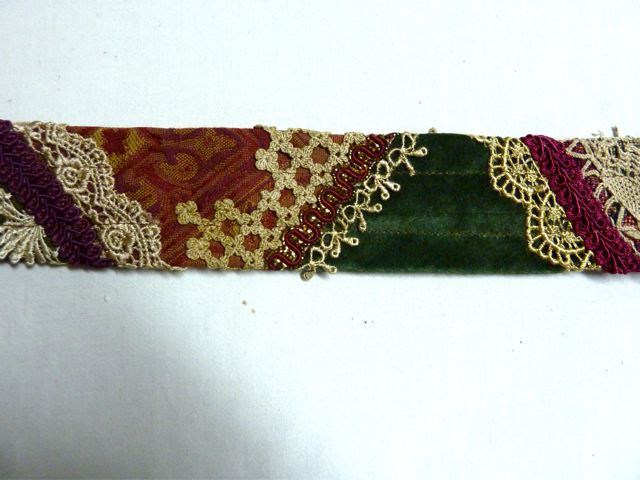
Since this is the side for the pocket I'm not putting a lot of trim in the middle.. The green line marks a very long seam covered with ribbon.. At the upper end I added trim on top of the ribbon and you can see how nice that looks.
I chose to piece the sides of my bag but Susie kept the bag itself plain tapestry
Then she chose to crazy quilt the pockets as shown here. We both used the same piecing technique of abutting the patches to eliminate bulk.
After all the trim, ribbon, and laces were sewn on each section of the bag...you can see the back on the left... Then I ironed on a piece of Allie's fusible tricot as the last step before assembly. It was still soft enough to feel like a bag but the tricot was just the right thing to give it enough body. I love that stuff.
Flap Construction
 Once I had the front, back, pocket and flap pieced, I lined the flap... Placing the lining and flap face to face, I sewed around the flap leaving the edge to be attached to the bag open so I could turn it right side out... It will be the first and only piece on my bag to receive fancy layers of fringes and trims....
Once trimmed you can set it aside until the bag is assembled.
I can hardy believe it is day five and Susie is going home today. We have had so much fun... Then we stitched until late into the night...
Since we stitched all evening the bags are gradually coming together. The gimp and laces are mostly still pinned but you can get a feel of where it is headed.
Mine is more tote than handbag as I will use it to take stitching items with me. It will be 16" square..
The gorgeous metal thing on the flap is a belt buckle... I have a fairly large collection of them and Susie picked two for the bags she is making.
The back has the gimp sewn and now I'm doing the laces. First thing today there will be some gold cording couched on the pocket... I'm working on all sections simultaneously to keep things evened out...
Susie has been working out of my stash and is anxious to get into her own stash at home..
I was lucky enough today to have some unexpected free time today and finished all the handwork on my Victorian carpetbag to the point I can make a lining and assemble it. On the left is the back without the pocket. All seams are finished and secured... Next to it you can see what it will look like with pocket added... Doesn't Cathy L's hummingbird block look precious...
On the left is the front without flap... You can see how nicely the rose spray looks and I added a small spiderweb on the lower left. All the trim is attached to the flap now except the buckle and its strap. I'm still vacillating between buckles and will make that decision tomorrow when I can lay them all out.
Layering and Attaching Fringes. Braids, etc.
The biggest challenge, as I see it, with the BoHo bags is dealing with the bulk at seams... bulk of the crazy quilting and the bulk of the trims. And if, like me, you want to use the richness of tapestry and decor fabrics, the challenge is even greater...
So I knew immediately I didn't want to add the trims to the seams as I sewed them. And I even didn't want to add them one at a time on top of each other... If I stacked them directly on top of each of as I went it would be about 3/4" thick... I needed to "feather" them out. So here is how I solved the problem for me....
 First I selected the fringes I wanted to use and laid them out in the order I wanted to stack them.. .I cut a piece of ribbon or bias strip a little longer that than I needed to trim a pocket, flap or edge. At the top of my choices of fringes is a piece of grosgrain ribbon 1 3/8" wide.
Then I sewed the first fringe (the long black chainette) along the bottom edge of the ribbon.
The I added the taupe cotton fringe to the ribbon.... slightly higher than the top of the black chainette fringe.
Next came the heavy (and the bulkiest) bullion trim...again just a tad higher than the taupe fringe.
Finally I added the tasseled fringe. You can see at the arrow that it is just a tad higher than the bullion fringe..
Now you can pick up the ribbon and attach it where you want on your bag... Your fringes are all perfectly aligned and the bulk is at a minimum. Once attached you can add a layer of decorative braid (see arrow) to cover the ribbon or bias.
Pocket Construction
Picture 1-1 (Susie's Magnetic Snap Instructions)I decided to place a magnetic snap in the middle of each pocket because I thought their size would cause them to droop in the center. I pressed a 1 1/2" hem on the top of the pocket. I placed the snap on the hem, 1/2" down from the turned edge. This allowed for a 1/2" seam at the bottom edge of the hem (to attach the lining). I placed the washer that came with the snap and marked slits for the prongs of the snap.
snap 2 - I then cut these two slits and inserted the prongs of the snap. I then decided to reinforce the area and added a small square of interfacing to cover the area around the snap
snap 3 - With the interfacing in place, I put the washer over the prongs and bent the prongs to the center using a pair of pliers
pocket lining 1- I figured out a way to line my pocket with no math involved! I cut lining fabric the same size as the pocket piece (with the hem opened up). Place the lining and pocket right sides together and sew a 1/2" seam across the top, leaving a large opening in the center.
pocket lining 2 - Open and press the seam toward the lining.
pocket lining 3 - Fold the hem down at the pressed 1 1/2" point and lay the pocket right side up with the excess lining hanging below the pocket.
 pocket lining 4 - Then just trim off the excess. You won't have to figure out how much the seam allowances take up or anything and the lining will match perfectly.
pocket 5 - Place pocket with right side of lining facing right side of pocket. Match bottom edges, pin and stitch down side, across bottom and up other side. Trim corners to remove bulk. I also trimmed one layer of the hem on the sides to reduce bulk.
Pocket 6 - Turn pocket through opening.
pocket 7 - To stabilize, I hand stitched the hem to my foundation fabric just below the snap. Herringbone stitch worked great for this.
pocket 8 - Pocket pressed and complete!
Pocket Placement
placement 1 - I decided where I wanted the pocket to be on my bag. Then lifted the top edge so I could see the center of the snap and put a tape measure right where the center was. The pin marks the center of the bag and the snap center is 3 1/4" down from the top.
placement 2 - I then removed the pocket and put the washer for the second part of the snap right where at the 3 1/4" point is.
placement 3 - I could then easily mark the two slits needed for this snap.
placement 4 - This is where I will cut the slits.
placement 5 - Because the bag is a single layer, I used iron on interfacing to reinforce the area. I cut a square large enough so that I wouldn't miss the place the slits go and pressed it on. Then proceeded to install the snap just like on the pocket.
placement 6 - Now I could snap the pocket on to the bag, pin the edges securely and stitch the pocket on to the bag. By doing it this way I was sure that my snaps would match and the pockets would lay flat against the bag. Once I had the pocket pinned down, I turned the bag inside out as I found that the easiest way to stitch by machine. I sewed the pocket on and added trims around them later. It would be much easier to put the pockets on while the bag portion was flat, but I couldn't judge pocket size or placement without seeing the bag size, so I made the basic bag part first and had to deal with adding things on with it all constructed.
Bag and Lining Construction (without flap)
construction 1- I made the lining and the bag in the same way. The photos are of the lining because you can see the stitching better. I cut the bag and the lining exactly the same size. I've found that the lining will hang better if it is slightly (1/2" or so) smaller than the bag, so I made larger side seams in the lining and trimmed a scant 1/2" off the top of the lining after construction. You can cut 2 rectangles (a front and a back) or cut one long continuous piece that goes from top front down and continues on up the back to the top. I made the bag with 2 rectangles so I had a seam along the bottom. I'm not sure why, but I thought that might be a little stronger. If you do it that way, join the front and back together first by placing front and back (right sides together) and sewing across the bottom of the bag, press this seam to one side and stitch down to reinforce. You can then cut your lining the same size as this newly formed rectangle.
I placed pockets on the lining before constructing the bag shape. I chose to put a zippered pocket on one side and patch pockets on the other. There are many ways to put in a zippered pocket and I found several tutorials so you should Google "how to put in zippered pocket" and choose the method that makes it easiest for you. I placed my pockets about 3" down from the top edge.
Fold the rectangle so that the top edges are facing up with right sides together. Stitch down each side, remembering to make the seams in the lining slightly larger than the bag seams.
construction 2 - To make a squared bottom, take hold of the bottom of one of the side seams and pull the front and back apart so that the seam runs down the center of the newly formed angle. I'm hoping that makes sense as I can't think of another way of saying it. The photo shows what it should look like. You then stitch across the angle directly perpendicular to the side seam. The point at which you stitch across the angle will determine the size of the bottom of the bag. I chose 3" as you can see in the photo. When you fold the bag to establish this angle you have a choice of which way the seam folds - to the front or back. It is quite helpful to make sure that the seams on each side of the bag face the same side - I chose toward the front of the bag.
construction 3 - I joined the lining to the bag inside by stitching the side seams together. I felt it helped to stabilize the bag and prevent the lining from moving around so much. You can skip this step and simply insert the lining into the bag, wrong sides together.
If you do choose to stitch the side seams together, lay the lining (right sides together) on a table with the side seams facing the table. Lay the bag (right sides together) on top of the lining with the side seams facing up (away from the table).
Beginning at the top, pin the bag and the lining together through all layers, with all side seams facing out. Pin these together down the sides to about 4" from the bottom. Stitch through all layers (at seam line) being sure that the bag is facing up. The seams are larger in the lining so if you stitch with the lining facing up, you will make the bag smaller (the same as the lining). Remove pins and turn the bag right side out. Your lining should be in place as in the next photo.
construction 4 - With lining inserted into bag, stitch around the entire top edge, joining the lining and the bag.
Adding the band for bag "without flap" like Susie's
Band 1 - I chose to extend the size of my bag by using the handle piece as a band around the top of the bag and piecing a handle from the scraps from the pocket construction. I cut my band 7" wide (allowing for 1/2" seams). The length was the measurement around the top of the bag + 1" for seams.
I felt I needed some interfacing to help stabilize it, so cut that 3" wide. I ironed on the interfacing 1/2" from the edge (to eliminate some bulk). I pressed under 1/2" on the side opposite the interfacing and joined the ends with a 1/2" seam. Pin the band to the bag placing right sides together with the non-pressed side facing the top of the bag. Stitch all the way around the bag.
Band 2 - Bring the band up with seams facing toward band. Fold band in half, down inside with pressed edge encasing the seams. Pin in place. This is basically like putting a waistband onto a skirt.
Band 3 - I stitched just below the band from the outside, catching the pressed edge on the inside. Basically a "stitch in the ditch" type of sewing.
Band 4 I stitched the tassel trim onto the fringe at the lower edge.
Band 5 - I stitched the top edge of the trims to the bag about 1 1/2" down from the top edge and above the seam so that I didn't stitch through the bulk.
Band 6 - I then decided that "Gerry's rule" of add one more thing meant that I needed an additional row of lace above the fringe trim
Bag Assembage with Flap
I made my lining just like Susie's in the previous section except I added two large inside pocket and a zippered one that slips down into a larger pocket. I will sew up the side with 3/4" seams and it will be ready to drop into the bag.
This is how the lining looks inside the bag before you put the bias strip on the bag... It is about an inch below the top of the bag so it doesn't add to the bulk of the seam when putting on the bias strip.
 I put the flap FACE DOWN over the back of the bag.... right on top of the pocket. Then I cut a 3" bias strip of a lightweight suede and sewed it around the top pf the bag... including right over the flap.
NOTE: If you are going to add a strap for a buckle now is the time.. insert a 10" strap between the flap and the bag. You can adjust the length as need later. I highly recommend a light weight strap because of the bulk.
 Then I trimmed the raw edges of that seam... not all at once. To reduce bulk I trimmed it layer by layer...sorta feathering it out.
  Then I pull the bias strip up and pressed it good
.
 At this point I put the lining into the bag and pull the bias strip down over the lining and fold under the raw edge and stitch by hand...
 And as Susie said I always want to add one more thing and in this case it was a nice piece of lace.
  If you pull the flap and strap over at this time it looks like this. Is this great or what??? I didn't add the buckle and adjust the length of the strap until the very last step.
Handle Options
 And then there's the strap which I have changed my mind almost hourly today.. Because of joint problems I rarely wear something hanging on my shoulder but it would be nice to have it adjustable if I needed it. This is a lovely medium-weight suede belt from the thrift store. It is aged nicely and I love the feel of it... It will be my first option . I will cut the buckle off and attach it separately to one side and attach the belt separately to the other side... Who knows this may all change quickly if I run into problems. I don't like to admit to being indecisive...rather very flexible.. Even still I have probably added more beading than I should have.
Keep in mind that from the beginning I never intended this to be a "Sunday best" bag. It is for my needlework and it will be in and out of the car, to meetings and on planes. So I have constantly constrained myself on adding anything that might be a problem for snagging or repair. And it must have a flat bottom and sit "proper."
I was lucky enough to have found this lovely soft suede belt to have for a handle on my bag and I could just stitch across the bottom and there was not worry about having raw edges...
But I realized if I were making a cloth handle (as I probably will on my next bag) that again there would be extra bulk and/or raw edges... So this is how I covered the straight seam on my suede handle and I could do the same with a cloth handle...
After I stitched it with a raw edge I layered a small round doily, a crocheted medallion and used a spectacular button to attach... the lace trim on the inside of the bag covers the button stitching.
And it turned out to be the perfect finishing touch. That metal button is about 1 x 1 1/2" beauty I've had for years and years and it was always just too big for anything... It was one of three so on my next time I will use the last one on one side of the bag and a mismatch beauty on the other side...
As an alternative you could do it all with buttons... Just use a couple buttons on the lower part and THEN attach lace and large fancy button. where the arrow is and the lower buttons would be covered and a stitch or two in the lace would keep any raw edges hidden...
Is this clever or what..? Sometimes I even amaze myself....
Susie's Spectacular Handle
Handle 1 - I wanted a long cross body handle so I cut foundation for the handle 4" wide by 50" long. I applied Misty Fuse to this foundation just like the construction of the pockets. The only difference is that I now have a zig zag stitch on my new sewing machine so used a wide zig zag to stabilize the seams.
Handle 2 - I then stitched lace on both sides of the seams using the same zig zag. You can't even see the stitches and it saved hours of time over the hand stitching I did on the pockets.
Handle 3 - Gimp and ribbon trim covered the seams and edges of the lace. This too was stitched on by machine using a zigzag stitch. Worked great!
Handle 4 - I then placed the handle right side down on my ironing board and pressed both edges in to the center of the handle. This made my handle 2" wide
Handle 5 - I then stitched a length of 1" velvet ribbon over the raw edges on the back of the handle.
Handle 6 - I did this by machine and it created perfect top stitching on the right side of the handle.
Handle 7 - To attach the handle to the bag, I took out the stitching of the fringe trim at the side of the bag. I just slipped the handle under the trim and stitched across it onto the bag - below the band, restitched across the top of trim and across the handle at the very top of the band.
Handle 8 - I found a piece of lace that had hanging flowers. Cut out a motif and stitched that on top of the handle on the bag just for trim. Love those little dangles closure
- I was lucky enough to receive this fabulous belt buckle from Gerry's collection, so I used a piece of velvet left over from my pockets to make a band for it. Some lace trim down the center completed it. I attached it to the bag in the center of the back, the same way I attached the handles.
Front - The buckle weights the band down as it hangs from the back onto the front of the bag and acts as a secure closure


 Since I wanted this to be as simple a construction project as possible I chose to do it in three simple pieces and really didn't need a pattern.


 Once I had the front, back, pocket and flap pieced, I lined the flap... Placing the lining and flap face to face, I sewed around the flap leaving the edge to be attached to the bag open so I could turn it right side out... It will be the first and only piece on my bag to receive fancy layers of fringes and trims....


 First I selected the fringes I wanted to use and laid them out in the order I wanted to stack them.. .I cut a piece of ribbon or bias strip a little longer that than I needed to trim a pocket, flap or edge. At the top of my choices of fringes is a piece of grosgrain ribbon 1 3/8" wide.


 pocket lining 4 - Then just trim off the excess. You won't have to figure out how much the seam allowances take up or anything and the lining will match perfectly.


 I put the flap FACE DOWN over the back of the bag.... right on top of the pocket. Then I cut a 3" bias strip of a lightweight suede and sewed it around the top pf the bag... including right over the flap.
 Then I trimmed the raw edges of that seam... not all at once. To reduce bulk I trimmed it layer by layer...sorta feathering it out.
  Then I pull the bias strip up and pressed it good.
 At this point I put the lining into the bag and pull the bias strip down over the lining and fold under the raw edge and stitch by hand...
 And as Susie said I always want to add one more thing and in this case it was a nice piece of lace.
  If you pull the flap and strap over at this time it looks like this. Is this great or what??? I didn't add the buckle and adjust the length of the strap until the very last step.
 And then there's the strap which I have changed my mind almost hourly today.. Because of joint problems I rarely wear something hanging on my shoulder but it would be nice to have it adjustable if I needed it. This is a lovely medium-weight suede belt from the thrift store. It is aged nicely and I love the feel of it... It will be my first option . I will cut the buckle off and attach it separately to one side and attach the belt separately to the other side... Who knows this may all change quickly if I run into problems. I don't like to admit to being indecisive...rather very flexible.. Even still I have probably added more beading than I should have.


.jpg)
